Saturday 10 December 2011

Create a (Internet) connection

Before you can connect to the internet, you need to install any hardware you have received. This may mean connecting a cable modem, wireless access point or DSL modem. If you get in a bind, call the ISP(Internet Service Protocol). It is there to help. Once the hardware is set up and if the ISP doesn't walk you through the process of configuring the connection in Windows 7, you'll need to access the Network and Sharing Center to create the connection yourself.


    1.  Click Start.

    2.  In the Start Search window, type Network and Sharing.

    3.  Under Programs, select Network and Sharing center.

    4.  Under tasks, Click Set up a new
         connection or network.

    5.  Click Connect to the Internet -
         set up a wireless, broadband, or
         dial-up connection to the
         Internet. Click Next.

    6.  When prompted, enter the
         information you obtained from
         your Internet Service Provider.
         This may include a user name
         and password.

    7.  Continue until you've input all of
         the required information. What you have to input will vary based on your ISP.


Extra Tip : Passwords are case sensitive; user names are usually not.

Explore for a file

Well some of you might don't know that only Windows 7 got this option of exploring window from Start menu. Exploring for a file is not a bit more complex then the other methods. In this method, you will open Windows Explorer and use the Explorer window to locate the file to open. (Note that i mentioned Windows Explorer not Windows internet explorer or Internet Explorer). :)


    1.  Right-click the Start button and click Open Windows Explorer.

    2.  Maximise the window and resize the panes to view the contents of the window.

    3.  In the left pane, expand and collapse folders until you have located file to open.

    4.  Double-click the file to open it.


Extra Tip :  Libraries let you access specific types of data quickly, no matter where they are stored on the
                    PC.
                    To expand and collapse any folder, click the arrow next to it.

Thursday 8 December 2011

Use Disk Defragmenter

A hard drive stores the files and data on your computer. When you want to access a file, the hard drive spins and data is accessed from the drive. When the data required for the file you need is all in one place, the data is accessed more quickly than if that data is scattered across the hard drive in different areas. When data is scattered, it's fragmented.


    1.  Click Start.

    2.  In the Start Search dialogue box, type Defrag.

    3.  Under Programs, select Disk Defragmenter.


    4.  Verify that Disk Defragmenter is configured to run on a schedule. If not, place a tick in the appropriate
          box.

    5.  To manually run Disk Defragmenter, click Defregment disk.

    6.  Click Close.


WHAT DOES THIS MEAN?
Copy: To copy the selected text, picture or object.

Clipboard: An imaginary 'clipboard' where data you cut is stored until you paste it, reboot your PC or cut something else.

Cut: To remove the selected text, picture or object and place the item on the clipboard.

Interface: What you see on the screen when working in a window. In Paint's interface, you see the Menu bar, Toolbox and Color box.

Paste: To place cut or copied data into another program, file or folder.

Wednesday 7 December 2011

Use Disk Cleanup

Disk Cleanup is a safe and effective way to reduce unnecessary data on your PC. With unnecessary data deleted, your PC will run faster and have more available disk space for saving files and installing programs. With Disk Cleanup you can remove temporary files, empty the Recycle Bin, remove set-up log files and downloaded program files, all in a single process.


    1.  Click Start.

    2.  In the Start Search dialogue box, type Disk Cleanup.

    3.  In the results, under Programs, click Disk Cleanup.


    4.  If prompted to choose a drive or partition, choose the
         letter of the drive that contains the operating system,
         which is almost always C:, but occasionally D. Click
         OK.


   5.  Select the files to delete. Accept the defaults if you
         aren't sure.


    6.  Click OK to start the cleaning process.    


WHAT DOES THIS MEAN?
Downloaded program files: These are files that download automatically when you view certain web pages. they are stored temporarily in a folder on your hard disk and accessed when and if needed.

Temporary Internet Files: These files contain copies of web pages you've visited on your hard drive, so that you can view the pages more quickly when visiting the page again.

Offline webpages: These are web pages that you've chosen to store on your computer so you can view them without being connected to the Internet. Upon connection, the data is synchronised.

Game news files and game statistics files: These are files related to games you'e played, such as how many wins and losses you have or new information regarding the games.

Recycle Bin: This contains files you've deleted. Files are not permanently deleted untill you empty the Recycle Bin.

Setup Log Files: These are files created by Windows during set-up processes.

Temporary Files: These files are created and stored by programs for use by the program. Most of these temporary files are deleted when you exit the program, but some do remain.

Thumbnails: These are small icons of your pictures, videos and documents. Thumbnails will be recreated as needed, even if you delete them here.


Note : You may not be prompted to choose a drive letter if only one drive exists.

Tuesday 6 December 2011

Record a sound clip

If you need to record a quick note to yourself, a music clip, a sound or other audible, it's easy with Sound Recorder. Sound Recorder is a simple tool with only three options : Start Recording, Stop Recording and Resume Recording. To Record, Click Start Recording ; to Stop, Click Stop Recording ; to Continue, Click Resume Recording. You save your recording as a Windows Media Audio file, which will play by default in Windows Media Player.


    1.  Click Start.

    2.  In the Start Search dialogue box, click Sound Recorder.

    3.  Under Programs, click Sound Recorder.


    4.  Click Start Recording and speak into your microphone.


    5.  Click Stop Recording to complete the recording.

    6.  In the Save As dialogue box, type a name for your recording and click Save.

    7.  Click the X in the Sound Recorder to close it.


Note : To record a sound clip, you need a microphone.

Sunday 4 December 2011

Take a screen shot

The Snipping Tool lets you dag your mouse cursor around any area on the screen to copy and capture it. Once captured, you can save it, edit it and/or send it to an email recipient. There are several ways to edit the ' clip ' or ' snip ' (either one will do for a name for the copied data). You can start by copying it or writing on it using a variety of tools. (These tools will become available after creating a snip). You can write on a clip with a red, blue, black or customised pen or highlighter, and if you mess up, you can use the eraser.


1.  Click Start.


2.  In the Start Search dialogue box, type Snip.


3.  Under programs, select Snipping Tool.


4.  Drag your mouse across any part of the screen.
     When you let go of the mouse, the snip will appear in
      the Snipping Tool window.


5.  Click Tools to see the options. You can use a tool to draw on the snip.


Extra Tip 1 :  You can take a screen shot of a webpage, document, presentation or anything else showing
                        on your screen.
                 2 :  If you mess up, from the Tools menu choose Eraser and ' ease ' what you just drew.

          Note  :  If you want to keep the snip you'll have to save it. Click File, click Save As to name the file
                       and save it to your hard dive.

Saturday 3 December 2011

Change the view in the Pictures window


When you open most folders, you will see additional folders inside them. You'll use these subfolders to organise the data you create and save, such as documents, pictures and songs. You open a folder to see what's in it and then you can change the appearance of the content inside these folders. You can configure each folder independently so that the data appears in a list, as small icons or as large icons, to name a few.


1.  Click Start.

2.  Click Pictures.

3.  Locate the Views button.

4.  Click the arrow next to Views and make a selection
     using the slider.


Extra Tip :  Show items in the Pictures folder as Large or Extra Large icons and you'll be able to tell what
                    each picture looks like without actually opening it in a program.


Shut down Windows safely

When you're ready to tun off you computer, you need to do so using the method detailed here. Simply pressing the power button can damage the computer and/or the operating system.


    1.  Click Start.        


    2.  Click the arrow shown here.


    3.  Click shut down. 
         (Windows normally shows   
           shut down tab before arrow                       
           but i have changed the 
          settings for my computer.)


Extra Tip
Many computers now come with a sleep button on the outside of the Desktop PC or on the inside of the laptop.Clicking the sleep button puts the computer to sleep immediately. If you're taking a break, you might want to try that now instead of completely shutting down the PC.

Friday 2 December 2011

Set the time on the clock gadget

Almost all gadgets offer a wrench icon when position your mouse over them. You can use this icon to access settings for the gadget. The first thing you may want to set is the time on the clock gadget.


    1.  Position the mouse pointer over the clock you dragged to the desktop. Look for the small x and the
         wrench to appear. Clicking the x will remove the gadget from the desktop. Clicking the wrench will
         open the gadget's properties, if properties are available.

    2.  Click the arrow in the Time zone window and select your time zone from the list.

    3.  Click the right arrow underneath the clock to change the clock type. Type a clock name if you like.

    4.  Click the left and right arrows to select a new clock, if you want to.

    5.  Click OK.


Note :  The Stocks gadget runs about 15 minutes behind real-time stock data, so don't start buying and
            selling based on what you see here. :)

Tuesday 29 November 2011

Add a Gadget to the desktop

Gadgets sit on your Desktop and offer information about the weather, time and date as well as access to your contacts, productively tools and CPU usage. You can evan have a slideshow of your favourite pictures. You can customise your desktop by adding gadgets and customising them to your needs.


1.  In the Start Search window, type Gadgets.


2.  Under Control Panel, click Desktop Gadgets.


3.  Drag any gadget to the desktop. You can drag as many
     as you like. Drag the Clock to the Desktop. (I'll tell you
     how to set it, in next post).


4.  Click the X in the top right corner of the Desktop  
     Gadget Gallery to close it.


Note :  You won't get up-to-date
            information on the weather,
            stocks and other real-time
            gadgets unless you're
            connected to the Internet.


CPU :  Your computer's Central Processing Unit ( the computer chip ). If the CPU usage is high, you can
            expect the computer to react more slowly then if CPU usage is low.

Search for a program

To locate a program on your computer you can search for it using the Start Search window. Just type in what you want and select the appropriate program from the list.


    1.  Click Start.

    2.  In the Start Search window, type Media.

    3.  Note the results.

    4.  Click any result to open it. If you want to open Windows Media Player, click it once.
         Note that its under programs.


Note :  When you search using the Start search window, all kinds of results may appear, not just programs.

Open an Application/Program or Gadget

Programs (also called applications or software) offer computer users, like you, a way to perform tasks such as writing letters or editing photos. You open programs that are installed on your computer from the Start menu. Once a program is open, you can access to its tools to perform tasks. For instance, if you open Windows Media Player, you can use the interface options to listen to music, create playlists, rate music and delete music (among other things). Here you'll open the Desktop Gadget Gallery.


    1.  Click Start.

    2.  Click All Programs.

    3.  Click Desktop Gadget Gallery to open the application. The Desktop Gadget Gallery lets you drag
         ' gadgets ' to your desktop.

    4.  Click the X in the top right corner to close the application.


Friday 18 November 2011

Top 10 Windows 7 Tips


Tip 1 : Changing Desktop Background


When it comes to buying a new PC/Laptop or upgrading to the new operating system, you will find that background image is already set and to personalize this you will have to choose an image that suits your liking and so to do this here are the following steps :

  • Right click on an empty area of the desktop
  • Click Personalize


Click Desktop Background
  1. For location, Select Windows Desktop Background. If it is not chosen already, click the down arrow to locate it.
  2. Use the Scroll bars to locate the wallpaper to use as your Desktop Background
  3. Select a background to use
  4. Select a positioning option ( The Default, Fill, Is the most Common)
  5. Click Save Changes
  6. Click the Red X in the top right corner of the personalization window to close it


Tip 2 : Use Flip 3D

Windows Flip 3D offers a quick way to choose a specific window when multiple windows are open. With Flip, you can scroll through open windows until you land on the one you want to use, then select it.

  1. With multiple windows open, on the keyboard hold down the windows key, which may have Start written on it (Windows logo otherwise), with one finger (or thumb)
  2. Click the Tab key once, while keeping the Windows key depressed.
  3. Press the Tab key again (making sure that the Windows key is still depressed) to scroll through the open Windows.
  4. When the item you want to bring to the front is selected, let go of the Tab key, then let go the Windows key.


Note : If Flip 3D doesn't work, or if you get only Flip and not Flip 3D, you need to enable a Windows theme in personalization options.


Tip 3 : Write a letter with Notepad

If your Word-processing tasks involve only creating a quick memo, note or letter and printing it out, or printing together a weekly newsletter that you send via email, there's no reason to purchase a large office suite like Microsoft Office (and learn how to use it) when Notepad will do just same. You can't create and insert Tables, add endnotes, add text boxes or perform similar tasks with Notepad, but you may not need to. Notepad is a simple program with only a few features, making it easy to learn and use.


     1.  Click Start


     2.  In the Start Search window, type                                        
          Notepad.


     3.  Click Notepad under Programs.
          (Note that you may see other
           results, as shown here.)


      4.  Click once inside Notepad and start typing.


Extra Tip :  The Edit menu lets you edit text you've written using cut, copy and paste, among other                      
                    features.         
                    The Format menu lets you change the font and font size.


Tip 4 : Back Up data to an external drive

You should learn early on how to back up data to an external backup device, like a USB flash or thumb drive or a network drive The easiest way is to drag and drop the data.


       1.  Click Start and click Computer. Position the window so it takes up only about half of the desktop

       2.  Locate the external drive. (Leave this window open.)

       3.  Locate a folder to copy. If necessary position the window that contains the folder so you can see
            both open windows.


     4.  Right-click the folder to copy.

     5.  While holding down the right mouse key, drag the folder to the new location.

     6.  Drop it here.

     7.  Choose Copy here. Don't choose Move here. This will move the folder off the computer and on to
          the hard drive.


Note : Before you begin, Plug in or Attach the external drive.


Tip 5 : Download and install Windows Live     
        Essentials

You need Windows Live Essentials. This free suite of programs includes Windows Live Mail, Live Photo Gallery, Live Toolbar and more.


    1.  Open Internet Explorer and go to https://www.windowslive.com/ (Once open, click on Desktop)

    2.  Look for the Download now button and click it.

    3.  You'll see a pop up tab appearing at the bottom of the same window. (or in a new window/tab)


    4.  Click Run, and when prompted, click Yes.


    5.  When prompted, select the items to download. You can select all of the items, some of the items i.e
         Bing bar. Then click Install.

    6.  When prompted to select your settings, make the desired choices. You can't go wrong here; there
         are no bad options.


Note : I have already installed all of these programs, that's why its just asking me to install Bing Bar.


Tip 6 : Get a Windows Live account


When you use ' Live ' services , like Windows Live Mail, Windows Live Photo Gallery and others, you need  to log into them using a Windows Live account. A Windows Live account is an email address and password you use to log onto your Live programs on the Internet. This account is free and you can use it to sign in to Live-related websites on the Internet.


    1.  If you do not already have a Windows Live account, click sign up after the installation of Live Mail
        completes. (You can also go to https://signup.live.com)

    2.  Fill out the required information and click I Accept when finished.


Tip 7 : Add a new user account and add 
        passwords.     


You created your user account when you first turned on your new Windows 7 PC. Your user account is what defines your personal folders as well as your settings for desktop background, screen saver and other items. You are the ' administrator ' of your computers. If you share the PC with someone, they should have their own user account. If every person who accesses your PC has their own standard user account and password, and if every person logs on using that account and then logs off the PC each time they've finished using it, you'll never have to worry about anyone accessing another's personal data.

    1.  Click Start.

    2.  Click Control Panel.
  
    3.  Click Add or Remove user accounts.


    4.  Click Create a new account.


    5.  Type a new account name , verify Standard user is selected and click Create Account. You can click
         Change the picture, Change the account name, Remove the password and other options to further
         personalize the account.


    6.  In Control Panel, Users Accounts, locate and click the user account  to apply a password to.

    7.  Click Create a password.


    8.  Type the new password, type it again to confirm it and type a password hint.

    9.  Click Create password.


Tip 8 : Import pictures from a digital camera 
        or media card       


After you've taken pictures with your digital camera, you'll want to move or copy those pictures to the PC. Once stored on the PC's hard drive, you can View, Edit, email or print the pictures (among other things).

    1.  Connect the device or insert the media card into the card
         reader. If applicable, turn on the camera.


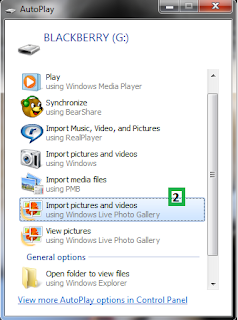
    2.  When prompted, choose Import pictures and videos
         using Windows Live Photo Gallery.


    3.  Click Import All new Items now.


    4.  Type a descriptive name for the group of pictures you're importing and click import.


    5.  View your new photos.


Extra Tip :  If desired, tick Erase after importing. This will cause Windows 7 to erase the images from the
                    device after the import is complete.


Tip 9 : Copy a music CD to your hard drive


You can copy CDs to your hard drive. This is called ' ripping '. To rip means to copy in media - speak. Once music is on your PC, you can listen to it in Media Player, burn compilations of music to other CDs and even put the music on a portable music device.

    1.  Insert the CD to copy into the CD drive.

    2.  Deselect any songs you do not want to copy to your PC.

    3.  In Windows Media Player, click the Rip CD button.


Tip 10 : Disable unwanted start-up items (Help 
         you  reducing time, windows takes to 
         start/Increasing your Windows Start-
         up time) 


Lots of programs and applications start when you boot/start your computer. This causes the Start-up process to take longer then it should, and programs that start also run in the background, slowing down computer performance. You should disable unwanted Start-up items to improve all - round performance.

    1.  Click Start.

    2.  In the Start Search window, type system configuration.

    3.  Under Programs, click System Configuration.


    4.  From the Startup tab, deselect third-party programs you recognize but do not use daily.

    5.  Click OK.


Note :  Do not deselect anything you don't recognise or the operating system!
            And; You'll have to restart the computer to apply the changes.